Category: Fixed (Page 3 of 4)

Wifi not connecting on Ubuntu 14.04 LTS 2 [FIXED]

After that partial upgrade and the annoying Docky issue finally fixed, I thought I was safe, but another annoying issue appeared,  and this time hitting closer to home!

One of the issues that occurred after the partial upgrade is that the wifi breaks after putting the computer to sleep. Bluetooth worked fine but the wifi won’t connect!
After a failed connection this message would appear:

Connection Activation Failed

(4) did not receive a reply. Possible causes include: the remote application did not send a reply, the message bus security policy blocked the reply, the reply time out expired
or the network connection was broken.

I tried fixing the issue, switching of the Wi-Fi did not work.

Looking on-line I found that the most suitable solution was to download Wicd. A graphical network manager that asked for the network’s name and password. And started the connection process until I had connection!

So there you have it! Install Wcid to fix the Wi-Fi breaking issue on Ubuntu 14.04.

Did you like this post? Share it with your friends. Sharing is caring!

Fix the p { margin-bottom: 0.1in; line-height: 120%; }a:link { } problem in your blog

It happens more often with me than ever, maybe because now I write my posts outside of blogger and then paste them (and there is nothing wrong with that by the way!). It makes my blog look bad and a lot less professional.

I tried so many things including font play and adjusting the breakers, nothing worked! I was able to fix it so easily, so read on to learn the complete fix!
My old fix was to delete the post and post it again, and I’d lose the comments, and a lot of time. But thankfully I was able to fix it on my own. I looked the problem on line and found nothing.

The Fix

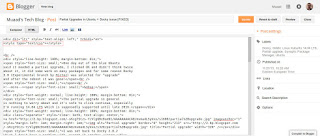
First of all if you publish your post and notice the Fix the p { margin-bottom: 0.1in; line-height: 120%; }a:link { } line where it shouldn’t be then go to blogger and edit the post.

The post has that line

On the edit menu you will see the button to the far left called “Compose”

Compose view

  and a button next to it called “HTML”, click on HTML.

HTML view

Even if you had zero knowledge with HTML, this fix is really easy (And I recommend you as a blogger to learn some HTML as it’s so easy to learn!).
What are we going to do is to remove the Fix the p { margin-bottom: 0.1in; line-height: 120%; }a:link { } line from the post, it’s highlighted in red so it should be easy.

The line to remove is highlighted in red

From the HTML view click find and search for “p { margin-bottom: 0.1in; line-height: 120%; }a:link { }” and you will find it looking like this <style type=”text/css” p { margin-bottom: 0.1in; line-height: 120%; }a:link { }</style
Delete only the line maintaining the brackets or you will result in an error, it needs to look like this after delete <style type=”text/css” </style
go back to compose and update, the problem will be fixed right away!!

So what’s the cause of this annoying bug anyway?

I discovered that it is caused by “Rich text formatting”, as I use LibreOffice to do all of my writing work, I tend to copy and paste directly into blogger, that caused these characters to appear inside the posts!

How to avoid it?

The only way is to strip the text of formatting before pasting it into blogger’s text editor, you can do that by clearing format from LibreOffice’s right click menu. Or by pasting it into a plain text editor like Notepad or Atom.

I hope you found this useful, how often did this happen to you? And how did you deal with it? Please let me know what you have in mind in the comments section below.

P.S: This post itself was infected with this issue, glad I could get it fixed eventually. 

Partial Upgrades in Ubuntu + Docky issue [FIXED]

One day out of the blue Ubuntu said it needed a partial upgrade, I clicked OK and didn’t think twice about it, it did some work on many packages and for some reason Docky 3.0 (Experimental branch by Rictoz) was selected for “upgrade” and after the reboot it was gone!
The partial upgrade in general is nothing to worry about and it’s safe to click continue, especially I’m running Ubuntu  14.04 LTS which is supposedly supported until late 2019.

I was set back to Docky 2.0.2 which I don’t have a problem with, except it crashes.

(If you read my Docky post you know that I chose Docky 3.0 over 2.0.2 because it’s more stable and doesn’t crash randomly all the time. Despite Docky 2.0.2 having cool “Docklets” that added to it’s functionality.)

I couldn’t install Docky 3.0 due to package dependency issues, and therefore I was stuck with Docky 2.0.2 for a while, only then I realized how much I depended on it to get my things done!

The fix was super easy!

I went to the downloaded files I had which were three files: Docky, Libplank, and Libplank common.

Using Gdebi I installed Libplank common the first, then Libplank and finally Docky 3.0, it replaces the old one and no need to uninstall.

Thing is every time it looks for updates it wants to remove Docky, and that happens daily, I found a way to fix that by simply “locking” the version.

I went to Synaptic and searched for Docky, selected it and clicked lock version under package. Now even when it looks for updates it greys out Docky and doesn’t update it. I have a detailed tutorial on how to use Synaptic that you can find here.

That’s how I got Docky 3.0 back after it was ruined by the partial upgrade, I hope you found this useful, please let me hear your feedback and have a nice day.

Error moving “file” on Uubuntu 14.04 fixed!!

Hey there fans! How are you keeping?
This bug has been one of my Pet Peevs on Ubuntu. Luckily I was able to fix it easily!! 

I noticed this bug when I switched from the default Thunar to Natilus on Xubuntu (While the title says Ubuntu, they are both the same, technically)

I used the desktop often while copying and handling files. What was strange that every time I tried to cut/copy from the desktop to another directory I get this error message

Error while moving "file"

“error while moving “ubuntu.jpg”.
There was an error moving the file into /home/user/documents/
show more details
error moving file: No such file or directory

That was weird! The file does exist! It’s right there!
I kept working around it by opening desktop in the file manager and moving the files. But that wasn’t handy!

Here is what I did to fix it:

1. I went to settings and clicked Preferred applications.

Settings menu

2. On the Preferred applications choose Default File Manager.

Default File Manager

3. Choose Thunar as the Default File Manager.

Choose Thunar as the Default File Manager

Close the settings to save the changes. And you are good to go!
I don’t know why is Natilus is having this bug! So the fix is just replacing it with Thunar!!
I hope you found this useful. Please comment below!

« Older posts Newer posts »