Category: Boot failure

How to fix and prevent the /dev/sda1: recovering journal On Ubuntu 16.04 Gnome

As I was booting my computer up one morning I saw this awful error message rather than the Ubuntu Gnome boot logo, it turned out to be a common error and can be fixed easily, let’s get to the details!

/dev/sda1: recovering journal

Cause of the issue

The problem occurs when the computer isn’t shut off properly or when electrical failure happens, some data on the SSD

isn’t stored properly and the boot process is halted.

In my case it’s the power issues that ruined my laptop battery and is making it’s way to my data stored on the SSD. 

How to fix it

The screen itself suggests a terminal command to fix the drive which was useless in my case, my easy fix was using a live Linux installation from a USB -I used Linux mint- and used Gparted to fix the damaged drive (please note that using Gparted can be very risky and cause data loss). 

Using Gparted from a live distro

We are using Gparted to fix the partition, it depends on how you did your disk but it’s the same way.
Entering the password to run Gparted.
Opening Gparted


  Viewing a list of disks on your computer.

View disks with Gparted


 Checking the drive for errors with the right click menu.

Checking the disk for errors using Gparted

We now click Apply changes.

Applying changes using Gparted
After applying changes we can safely reboot, the fix is done!

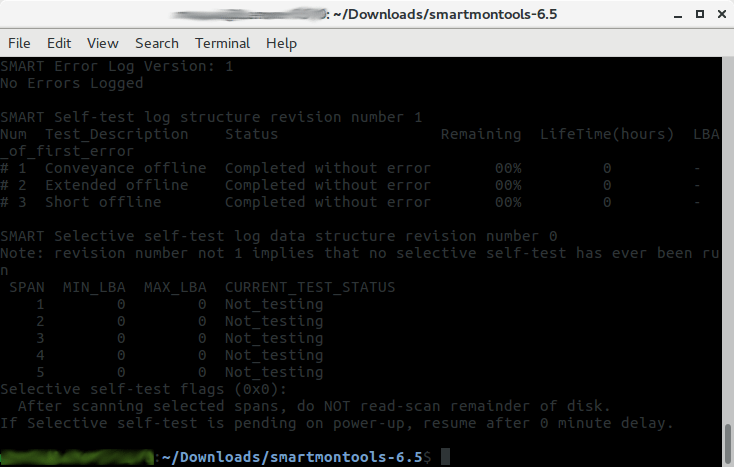
Making sure damage didn’t happen

ِAfter rebooting the computer will open as usual, but we want to make sure that the drive wasn’t damaged, to do that we will install a small command line tool called Smartmontools 6.5 and it can be downloaded from this link.

Installing Smartmintools-6.5

Samrtmontools is a terminal utility
to check and monitor disk performance. 

To install Smartmontools we need to un-compress the tarball and we do this from the terminal

  tar zxvf smartmontools-6.5.tar.gz

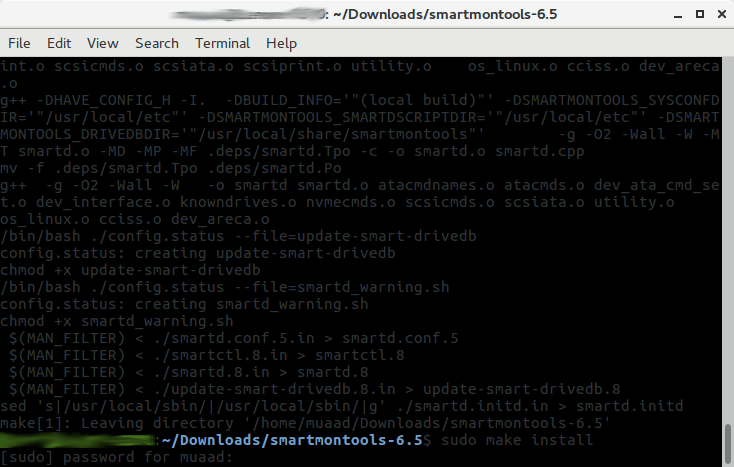
The previous step created a directory called smartmontools-6.5 containing the code. Then we go to that directory, build, and install:

 cd smartmontools-6.5

  ./configure
  make
  sudo make install

After running these steps we managed to install Smartmintools-6.5 tarball from the terminal.

Running Smartmintools-6.5

Run the command:  sudo smartctl -a /dev/sda. And if the results are like the the screenshot your drive is safe, as it says clearly: No errors logged.


How to make the fix automatic on every boot

Instead of performing the fix every time the issue happens, it’s easier to set the config autofsck to run at every boot. 


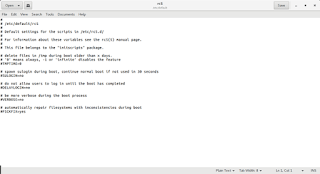
Edit the file etc/default/rcS and change the FSCKFIX from no to yes by using this terminal command:


gksu gedit /etc/default/rcS
Here it opens a gedit windows, navigate to the last line.

Editing /etc/default/rcS

Change the FSCKFIX from no to Yes and save to finish.

Editing /etc/default/rcS

This way every time the issue occurs the system will automatically fix it and continue booting normally. 

This is how to fix and prevent the /dev/sda1: recovering journal on Linux Ubuntu Gnome 16.04 and similar distros, it’s really easy to fix but it can be scary and ruin a day for you if you don’t know what to do.
And I highly advise you to backup whenever possible

A fix to many of ubuntu’s boot problems!

Ubuntu's Logo

Hey there you guys, How are you keeping?

I hope you are doing good!
I’ve been quite busy these days! Many things happening and I am struggling to keep up. One of these things is my brother’s laptop!
My brother is a new Ubuntu user. He spent all his life using Windows then he decided to take the jump. I advised him to take his time and study it thoroughly. Because using a new operating system takes time to get used to. He did what I told him and he was more than happy to have Ubuntu, but that’s when problems started to happen!!

At first. It was the “Press S to escape problem”. The option I didn’t do anything and the usually bullet fast Ubuntu boot took 10 minutes! And none of the fixes I came across on Askubuntu fixed it. There I had to do the unforgivable!

I formatted the drive and reinstalled Ubuntu! I thought that would fix the problem. Sadly I was mistaken!
Press S to skip mounting or M for manual recovery!

A new problem emerged! This time it was the dreadful ”error reading sector 0xx Problem in HD 0” . I ignored it and tried a workaround! (That’s after checking the drive using Gparted) I was faced back with the “Press S to escape problem” again!!
At this point, I was losing it totally!!
I tried some fixes and the problem went away! Soon after he came to me and said he couldn’t install anything!
For the third time in two weeks I took the computer to repair it. And after a day and a night I was hopeless!
The system isn’t responding to any repair attempt. And it’s driving me insane.
After some lucky Googling it turns out that the problem was in the HDD itself! A quick test using Partedmagic boot disk confirmed my doubts! We had to throw out the old HDD and get a new one.
Now I’m hoping that this would finally solve his problem! So I can find some time to do other things, say post to this blog maybe 😉
Anyway while I worked on it I learned many things and tricks that will help me with Ubuntu even more. And it made me consider re-writing a post I made some time back. Can you guess what it was?
Ubuntu is a great system, and all these problems didn’t make me lose faith in it. I felt like sharing what was I up to so you guys know!

And if you get any of the error code mentioned above. Take a look at the HDD. It could save you tons of time!!


What did you think of this post?  Did you ever have these problems?
Let me know what you have in mind in the comments section below!

How to fix the boot failure in windows 7

 Hey there 🙂 And welcome to a new post 🙂

 A huge part of being a geek is being the first to go to / call when computers fail! I don’t know why!
This time it’s not related to Linux, not directly at least!
For this particular issue this laptop was an e-machines running windows 7 home edition. It was a bit old and the battery was depleted. The same laptop from this post actually!

What’s wrong with it?

It had to be connected all the time or it would power off attempting to save the session, if it failed doing so it would refuse to power up again! When I press the power button after connecting it to power it shows the boot logo then it powers off right away!!
Many people would assume that the system is gone! And they need to reinstall it.
The first thing to do is to check the drive using a Linux CD or a Bootable USB. You will see that the system drive is intact. Then what is the problem?
The repeated power failures ruin the boot files located in the hidden boot partition, and the only way to fix them is by repairing the boot!

The fix is pretty simple!

1. Enter the windows installation disk or USB installer, it has to be the same version as the windows installed!: e.g Professional, home premium etc. In this case we need home premium. (Fell free to test with another version and tell me what you got 😉 )
2. At the install Windows window , choose the language and keyboard (As your system settings ).
3. Select advanced options ( You will find it below the installation options to the left of the screen)
4. From there you will find four options, pick repair boot (First option) and hit OK.
After a reboot your computer will be OK!
As simple as that! Sorry I have no pictures. It’s because the setup menu has no print-screen functions (AFAIK).

P.S: I have made this fix a couple times! I noticed at some extreme cases the boot screen won’t even show! Go to bios menu and make sure the F12 menu is enabled. Then boot from boot disk or USB 😉