Category: Boot (Page 2 of 2)

Measure boot time on windows and see what is taking it so long!

Hey guys! How are you today?

I managed to shave some minutes off my boot time. It was taking 5-7 minutes to boot! And that’s a lot of time!!

As I mentioned in the dual boot path, windows was really slow to boot. And it depends largely on what software you allow to start with windows. As you can see in the Task manager of Windows 8. You can see the programs starting with the system from the Startup tab. Enable them or disable them, and determine how much impact do they present to the overall boot.

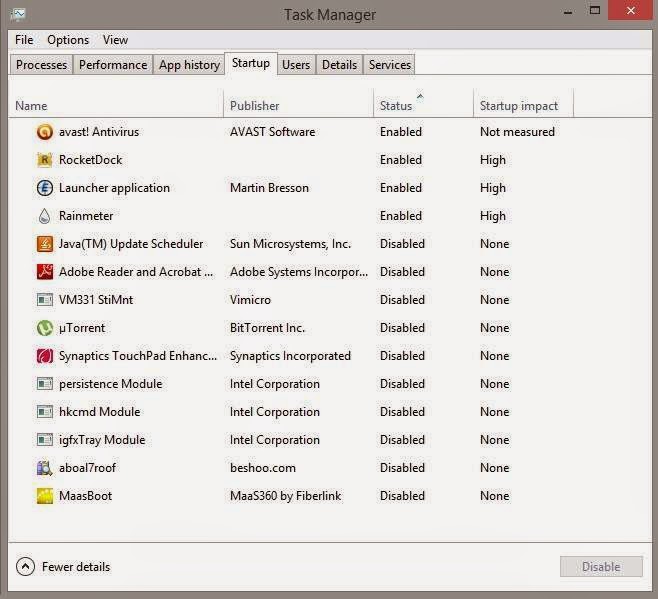
As you can see some programs have high impact and those present the prime suspect to slow boot

I installed Maasboot. A freeware that measures the boot speed of your computer boot and records it over time and creates a chart of it.


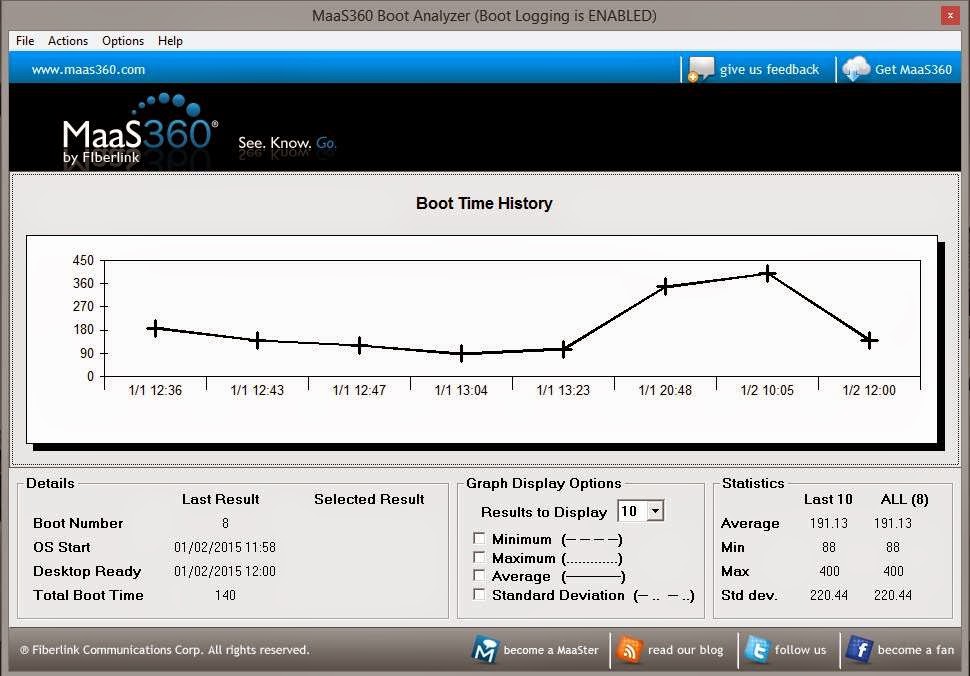
It’s really helpful to see the effects of programs on boot against time. By disabling and enabling some software (High impact of course ) and restarting, I was able to determine what was taking it so long!

what I did was uninstalling Nexus dock and Rainmeter And installing the amazing Rocket Dock.  And the boot time improved greatly, then a few days later I installed Rainmeter’s latest version. And the boot time was decent so I kept it.

To sum up. I had to let Nexus dock go! Sad as it may seem. But boot time matters more to me. And Rocket dock is a really good dock and favors performance!

I hope you find this post useful and it helps you with your daily life.

I’m looking forward to your feedback!

Was this post helpful to you? Post your last boot time and let’s see how is it faring!

How to create bootable USB for Linux?

Hey guys, how are you doing today?

Today we are putting Linux on a USB! Really easy and very important!

As we said in the Acer Netbook repair post  that we will post about making bootable USB for Windows and Linux. We are using the same method we used to put Windows on a USB. Only this time, it’s much easier!
That’s because most Linux distributions are downloaded off the internet as .ISO files, no need to use Infrarecorder to change them!

I have to admit! I based this article on a previous post. Only because it’s THE EXACT SAME WAY.

Steps to make the bootable USB:

For this step we are going to need a software called YUMI. (Your Universal Multiboot Installer ) Also free and can be downloaded from Here.. I found this to be the easiest way around when it comes to burning ISOs on a USB. And it can add many ISOs on one flash! So it’s efficient and easy!

1. After the download run the setup and click agree.

2. From this window select the USB drive you are going to use.

A. Select  from the drop-down list. It has many Linux distributions and many live CDs too. Scroll down to find the distribution you chose, for example: Ubuntu
B. Browse for the ISO we downloaded, note that the name of the ISO will be the name in the boot menu.

3. On the warning menu choose yes (will format the USB so double check)

4. You will see the progress windows copying all the files to the USB.


5. Wait for a few minutes and you are done!
You can add other ISOs using the same steps, or remove them if you like!

6. Yes will reopen the selection window while no ends the program .

7. After you are done, make sure to back up the data on the target computer. Reboot it and select from the boot selection menu ( Usually accessed by F12, can vary depending on the bios ). And continue form there 😀 .

That was it! Pretty easy isn’t it? I hope you enjoyed it as much as I enjoy making it 😀
Please feel free to leave your feedback.
This post will be mentioned in my next post! Stay tuned!
Have a nice day 😀

Acer Aspier A5 11 inch Windows 8 boot problem + fix so far

Hey you guys
You probably checked out the slick notebook by Acer. Acer Aspier A5 11 inch. It comes with neat features compared to price. Most notably a touch screen and Windows 8 OEM, sadly it has a fatal bug!!


The issue

As I searched the web ( including the Acer help ) I noticed a lot of people talking about it online and no one has a clear answer .. 🙁

What happens is: After a short while the computer refuses booting!!

No matter what you do, It won’t boot!

Since it doesn’t have a DVD-ROM there isn’t a way for you to insert the disk to restore Windows !

Even if you were slick enough to use a USB drive. It’s hopeless..

Any and all settings lead to nothing at all ..

So I was fiddling with it. Being an open source fanatic I decided to give my Linux live USB a go. I wasn’t able to boot as well!!

My fix was really simple, all you need us the windows USB and the Ubuntu USB. I’ll make a post on how to make bootable media next year 😉 notice the date 😉

**Update the tutorial for windows can be found here

**Update 2 the tutorial for Linux can be found Here

Steps are as follows

1. Insert the Windows USB installer.

2. Go to advanced options and then to command prompt.

3. Insert the following command to disable hibernate ( I’ll tell you why in a minute ) powercfg /h off then shutdown /s /t 0

4. After rebooting go to bios and change boot type from UEFI to Legacy. Save the changes and restart.

5. Make sure the Ubuntu flash is connected, boot from it.

6. Select try Ubuntu and in a minute you will get the desktop. Click the hard drives to gain access to your media and recover it.

7. The commands you entered from step two is to access the drive under Ubuntu, or else you will receive an error message saying you can’t access the drives. Because windows 8 doesn’t really shutdown, it hibernates to save boot time.

Also note that the BIOS moves very fast so make sure you press really fast too 😀 and if it doesn’t work check the boot order from the f2 menu putting USB as the default boot device ..

This is how to recover the media. And frankly this is what I was asked to do on the Acer Aspire A5 11 inch. I hope it helps. And if I make any changes I’ll post a new post referencing this one 🙂

*Update!! Problem fixed!

Check this link for full details 😀

Newer posts »