Category: Boot (Page 1 of 2)

Kubuntu 16.04 slow boot [FIX]

Kubuntu has a reputation for being one of the slower and heavier flavors of Ubuntu, and some users accepted that as a fact and decided to live with a slow boot rather than doing something about it, fear not fellow Kubuntu user, because I have your back!

Understanding the issue

After moving from Ubuntu Gnome 16.04 to Kubuntu 16.04 I noticed that the boot became much slower! I thought this was a temporary problem but a quick searched showed me I’m in for the long haul!
Even when using an SSD, my system was ready to use after almost 2 minutes (1.48 to be exact!) and thats’ slow even for a computer running Windows on a 5400 rpm HDD!

To put you in perspective, Ubuntu Gnome needed less than 10 seconds to fully boot to desktop (I had the black screen issue, but still..).

Now let’s not waste too much time with the problem, it’s time to fix the issue!

The solution

There are several tweaks that can be done to fix this issue, I found all of them on askubuntu, and managed to shave down the boot time from 1.48 minutes to 19 seconds!

First fix: Pre-boot

  • At first I went to my BIOS and changed the Sata mode from AHCI to Compatible, Ubuntu gnome wouldn’t boot unless the controller was AHCI.
  • Then I disabled the Intel Virtualization Technology because I no longer use VirtualBox.

Second fix: Removing the deleted swap partition entry from Fstab

When I installed Kubuntu 16.04 it came with a swap partition, and since I didn’t use hibernate it was safe to delete it by making sure of the UUID from the BLKID command, I forgot to delete it from Fstab and that causes the system to boot slower because it’s looking for swap.

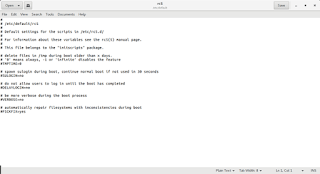
I entered the command:sudo kate /etc/fstab command to edit fstab with root privileges and it looked something like:

    /etc/fstab: static file system information.

    #
    Use ‘blkid’ to print the universally unique identifier for a
    device; this may be used with UUID= as a more robust way to name devices
    that works even if disks are added and removed. See fstab(5).

    #
    / was on /dev/sda1 during installation UUID=4840d72b-2435-4dc1-9227-ab7671fd3d93 / ext4

    errors=remount-ro 0 1
    swap was on /dev/sda5 during installation UUID=0023c124-ea85-41d2-834c-83f6877d6959 none swap sw

    0 0

After deleting the swap entry (in green) it became like this: 


    /etc/fstab: static file system information.

    #
    Use ‘blkid’ to print the universally unique identifier for a
    device; this may be used with UUID= as a more robust way to name devices
    that works even if disks are added and removed. See fstab(5).

    #
    / was on /dev/sda1 during installation UUID=4840d72b-2435-4dc1-9227-ab7671fd3d93 / ext4

    errors=remount-ro 0 1

Third fix: Tweaking Services

Disabling services isn’t the best idea especially if you aren’t sure of what you are doing, but tweaking the services start and stop times could mean the difference between a slow and a fast boot! To be able to do so you need to edit System.conf

To edit system.conf enter the commandsudo kate /etc/systemd/system.conf into the terminal and search for the line#DefaultTimeoutStartSec=90s and remove the “#” to change it from being a comment, and set the value to 1 rather than 90, and do the same for #DefaultTimeoutStopSec=90s.

After this tweak the processes will start and stop much faster, and so does your computer!

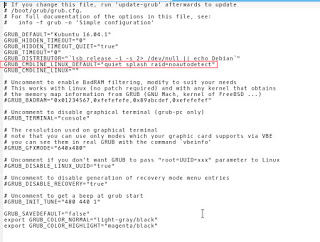
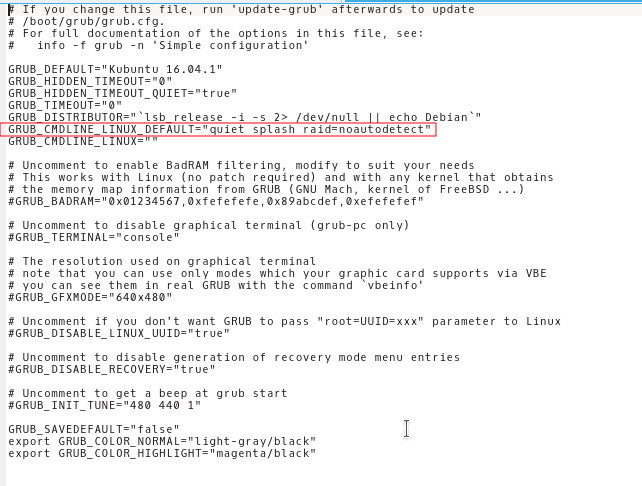
Fourth fix: Tweaking Grub

Enter the command into the terminalsudo kate /etc/default/grub and add the and added raid=noautodetect toGRUB_CMDLINE_LINUX_DEFAULT to become:

   GRUB_CMDLINE_LINUX_DEFAULT=”quiet splash raid=noautodetect”

Thensudo update grub 2 sudo update grub

 
Boot time is now 19 seconds.

Thanks for reading!
Please share it on social media and have a nice day. 

How to fix and prevent the /dev/sda1: recovering journal On Ubuntu 16.04 Gnome

As I was booting my computer up one morning I saw this awful error message rather than the Ubuntu Gnome boot logo, it turned out to be a common error and can be fixed easily, let’s get to the details!

/dev/sda1: recovering journal

Cause of the issue

The problem occurs when the computer isn’t shut off properly or when electrical failure happens, some data on the SSD

isn’t stored properly and the boot process is halted.

In my case it’s the power issues that ruined my laptop battery and is making it’s way to my data stored on the SSD. 

How to fix it

The screen itself suggests a terminal command to fix the drive which was useless in my case, my easy fix was using a live Linux installation from a USB -I used Linux mint- and used Gparted to fix the damaged drive (please note that using Gparted can be very risky and cause data loss). 

Using Gparted from a live distro

We are using Gparted to fix the partition, it depends on how you did your disk but it’s the same way.
Entering the password to run Gparted.
Opening Gparted


  Viewing a list of disks on your computer.

View disks with Gparted


 Checking the drive for errors with the right click menu.

Checking the disk for errors using Gparted

We now click Apply changes.

Applying changes using Gparted
After applying changes we can safely reboot, the fix is done!

Making sure damage didn’t happen

ِAfter rebooting the computer will open as usual, but we want to make sure that the drive wasn’t damaged, to do that we will install a small command line tool called Smartmontools 6.5 and it can be downloaded from this link.

Installing Smartmintools-6.5

Samrtmontools is a terminal utility
to check and monitor disk performance. 

To install Smartmontools we need to un-compress the tarball and we do this from the terminal

  tar zxvf smartmontools-6.5.tar.gz

The previous step created a directory called smartmontools-6.5 containing the code. Then we go to that directory, build, and install:

 cd smartmontools-6.5

  ./configure
  make
  sudo make install

After running these steps we managed to install Smartmintools-6.5 tarball from the terminal.

Running Smartmintools-6.5

Run the command:  sudo smartctl -a /dev/sda. And if the results are like the the screenshot your drive is safe, as it says clearly: No errors logged.


How to make the fix automatic on every boot

Instead of performing the fix every time the issue happens, it’s easier to set the config autofsck to run at every boot. 


Edit the file etc/default/rcS and change the FSCKFIX from no to yes by using this terminal command:


gksu gedit /etc/default/rcS
Here it opens a gedit windows, navigate to the last line.

Editing /etc/default/rcS

Change the FSCKFIX from no to Yes and save to finish.

Editing /etc/default/rcS

This way every time the issue occurs the system will automatically fix it and continue booting normally. 

This is how to fix and prevent the /dev/sda1: recovering journal on Linux Ubuntu Gnome 16.04 and similar distros, it’s really easy to fix but it can be scary and ruin a day for you if you don’t know what to do.
And I highly advise you to backup whenever possible

A fix to many of ubuntu’s boot problems!

Ubuntu's Logo

Hey there you guys, How are you keeping?

I hope you are doing good!
I’ve been quite busy these days! Many things happening and I am struggling to keep up. One of these things is my brother’s laptop!
My brother is a new Ubuntu user. He spent all his life using Windows then he decided to take the jump. I advised him to take his time and study it thoroughly. Because using a new operating system takes time to get used to. He did what I told him and he was more than happy to have Ubuntu, but that’s when problems started to happen!!

At first. It was the “Press S to escape problem”. The option I didn’t do anything and the usually bullet fast Ubuntu boot took 10 minutes! And none of the fixes I came across on Askubuntu fixed it. There I had to do the unforgivable!

I formatted the drive and reinstalled Ubuntu! I thought that would fix the problem. Sadly I was mistaken!
Press S to skip mounting or M for manual recovery!

A new problem emerged! This time it was the dreadful ”error reading sector 0xx Problem in HD 0” . I ignored it and tried a workaround! (That’s after checking the drive using Gparted) I was faced back with the “Press S to escape problem” again!!
At this point, I was losing it totally!!
I tried some fixes and the problem went away! Soon after he came to me and said he couldn’t install anything!
For the third time in two weeks I took the computer to repair it. And after a day and a night I was hopeless!
The system isn’t responding to any repair attempt. And it’s driving me insane.
After some lucky Googling it turns out that the problem was in the HDD itself! A quick test using Partedmagic boot disk confirmed my doubts! We had to throw out the old HDD and get a new one.
Now I’m hoping that this would finally solve his problem! So I can find some time to do other things, say post to this blog maybe 😉
Anyway while I worked on it I learned many things and tricks that will help me with Ubuntu even more. And it made me consider re-writing a post I made some time back. Can you guess what it was?
Ubuntu is a great system, and all these problems didn’t make me lose faith in it. I felt like sharing what was I up to so you guys know!

And if you get any of the error code mentioned above. Take a look at the HDD. It could save you tons of time!!


What did you think of this post?  Did you ever have these problems?
Let me know what you have in mind in the comments section below!

Acer Aspire V5-P122 boot problem FIX !! OEM saved!!

Hey there you guys 🙂
I’m happy to report I was able to fix the Acer Aspire V5-P122 boot problem!

I must emphasis that this tutorial is at your own risk and I can’t be held  responsible for any damages that occur from it! I’m not even sure this is 100% legal and that it doesn’t void Acer warranty! In this case we don’t have an Acer service in our country (It was imported) and therefor I had to take action (To save the OEM license) ..

After the long introduction, let’s get down to business:
As you remember in this post we managed to make the Acer boot under Linux by changing the boot settings. And we could access the hard drive after accessing the repair mode under windows and writing some commands. For the full steps go to this post.
At this point we have our data at hand (since we booted under Windows for repair. Then under Linux for data recovery), we could easily backup the data to an external hard drive, but can we restore Windows?

Sadly I couldn’t manage to use any of the options to make the laptop work again!

  • I couldn’t refresh the system.
  • I couldn’t use the repair utility from the setup.
  • I didn’t have an image ( and I doubt that would have done anything ).
  • It won’t restore to a previous restore point.

Well a mistake happened with us and it totally wiped the hard drive! What happened was instead of booting Linux into live mode I installed Linux on the whole drive! Wiping the data and partitions completely !! ( Deleting the system partition, data partition, the recovery partition. And all of Acer’s bloatware!)

A fresh start

With nothing at hand, I knew that I needed to format! My main concern was the Windows license!  Now I have to go shopping for another Windows version! But I just got this laptop! And it has OEM Windows already on it! Isn’t there a way to keep the license?
Well .. There is 😀
Luckily the new Windows license is stored in the BIOS. Meaning it won’t be lost even if the hard drive was replaced!

Next step

The only thing left now was to install windows again, it’s pretty basic. Checkout the detailed method in this post I made sometime ago 🙂
Again I was stressing, will the license be picked by the setup?
I couldn’t find that version of Windows to install with anywhere! All I could find was the Pro version! Does that mean I have to buy it again? Or I should transfer the license from my other laptop and use it here. Keeping that device a Linux machine?
Anyway I begun the installation via USB ( The Acer doesn’t have a DVD-Rom).
After the setup was complete it noted that windows wasn’t activated, but it was reading the license file!

Viewing the License

I knew that because I downloaded the Nirsoft license viewer tool and tested it on my other device, 100% accurate!
It showed when I used it on the Acer Netbook that indeed the OEM bios has a license. It was yet to be activated.

Powerful command

I used this command and restarted the computer. After the restart I clicked Activate Windows
Windows was activated (With the O.E.M license!!). And it was downgraded to Windows 8 ( The setup was 8 Pro)!!
It was a total success!
I postponed creating a system image until upgrading to 8.1 (it’s equal to a format).
And that was it!
Maybe you need to call Microsoft after the format! And if you have an Acer reseller. Go to them! ( As I said, we have no means of support. I tried to make this as legal as possible. I hope it doesn’t violate any laws)

Final words

To sum the whole post in a paragraph: I reinstalled Windows 8 Pro and activated windows via the O.E.M bios, downgrading it to Windows 8.
Of course I lost all the Acer tools, guides, drivers and even bloatware!
Again I must insist to resort to this as a final solution knowing it may void your warranty!
I hope you find this post useful. Please tell me what occurs with you!
Have a nice day 🙂
Make sure to follow my blog and join my mail-list NEW

« Older posts