إنه أربعاء آخر بهيج من حياتي! أخذ مقعدي اﻷثير – ليست الكنبة الخضراء، فتلك راحت ضحية الحرب اﻷهلية – أنا أتحدث كرسي البلاستيك الذي يهدد بإصابتي بإعاقة مستديمة. وأسعل ليس من فرط التدخين، بل هي السامينسا – منها لله -. وأبدا في قص وقائع حديث اﻷربعاء لهذا اﻷسبوع ..
Category: Hard-disk
Here is a problem that is going to ruin your day. But it’s super easy to fix.
———————————————————————————————————————————–
Update February 2021
- Run CMD as administrator.
- Enter this command:
chkdsk /f x:
Where (x) is the name of your hard drive. - Let it work, and you’re good to go!
———————————————————————————————————————————–
I must note that the screenshots weren’t taken at the actual recovery job, but afterwards. And please check the disclaimer before continuing with this post.
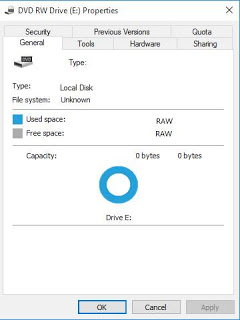
When your drive is RAW and you think all your data is gone. The reason is because the partition is damaged but all of your data is intact..

As long as the HDD isn’t clicking when connected and running normally. This fix applies to you. Disclaimer: (Attempt at your own risk) I’m not responsible of any data loss. Continue at your own risk..
I first tried with TestFisk 7.0 But after a day and a half (yes a day and a half!) and the data I recovered was jumbled and nameless (mostly there but scrambled) and totally out of place!
I attempted a fix the HDD with Gparted but it didn’t work and caused my system to freeze.
And I always recommend to have a backup of your data.
What I did was a simple format (after verifying that the data was there using TestDisk 7.0).
All you have to do is to is to format the drive (yes!!) and then preform a recovery on the drive to recover the data with the data structure intact.

Make sure you start the recovery immediately after the format to make sure no files are overwritten.
I used Recuva because it’s free, really easy to use and has a nice interface and it uses a wizard so it’s even more simpler. In case you are a first timer, I’ll post detailed steps 🙂
Download and install Recuva and start it to see this screen, and click Next.

On the next step choose other to show all files
and click Next.

On the next screen we want to recover our lost data so we choose the newly formatted HDD and click Next.

Now choose if you want to enable deep scan, this will take a long time depending on your drive size and data. Check it and click next.

Let the setup run, this may take HOURS so keep in mind to plug in your laptop or to get a UPS. And the program will be minimized.

Once it’s done, you will see the results page.

Now that the data is recovered, it’s time to save it on your computer. Don’t choose the drive you scanned as a recovery directory.


Wait for the recovery to end. if it’s a lot of files it will take a really long time!

Once the recovery is done, you are shown the results page.

Click OK and we are done!!
How easy was that?
I hope you find this useful. And that it saves your day!
Hey there guys! What’s up?
It happens to all of us! Suddenly a HDD fails and wont boot or run. Is all that data gone?
Well, maybe not
Assuming you have a backup of your data. physical or via a cloud server. Because loss can happen anytime!
There are some things to try before throwing that HDD away!
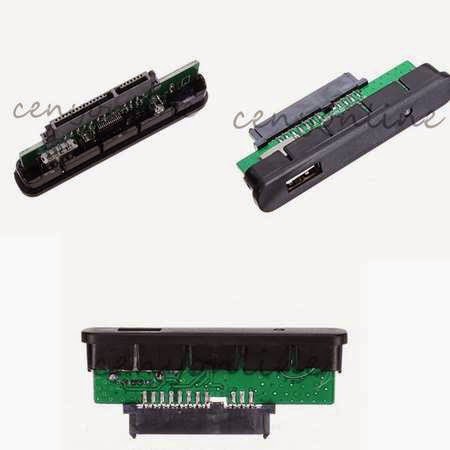
Depending on the HDD type you can connect it to another computer. If it’s an external then you need a special connection.
The fault might be in the adapter of the HDD and changing it would resolve the problem!
This is an adapter that connects to the HDD
If it’s an old IDE HDD you need an IDE cable and of course a case computer to try it on. If you don’t have one or simply don’t feel like taking a dusty case apart then I recommend one of these:
these connections can connect the SATA / IDE to a USB interface. No need for a case computer there!
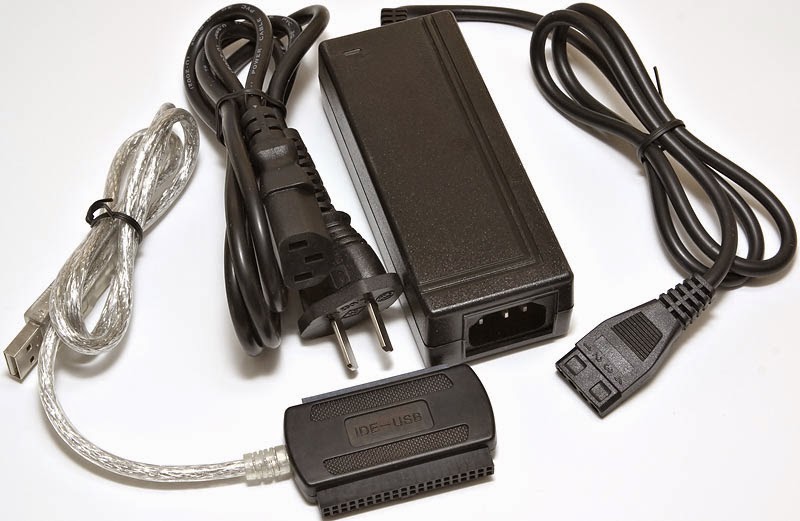
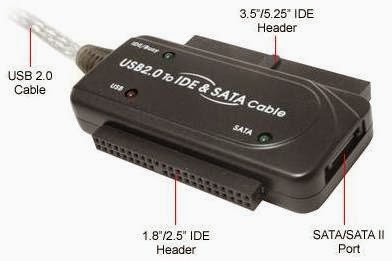
You have to be very careful when connecting these connections
connecting the wrong cable would burn the HDD. Even if it was running!
Happened with me and it was not pretty at all :'(
so to sum up. Try this trick when facing a HDD problem. And remember to always backup!
See you guys in a new post!
Please interact with my post! It keeps me going ..
أنا الفائز بجائزة المدون المنتظم لعام 2025 من موقع مرجع التدوين
