Category: How to (Page 17 of 20)

ClipGrab. Your all media download solution for Ubuntu

Hey there you guys. How are youdoing? I hope you are doing good!
If you are in town looking for the easiest way to download videos from the Internet. Then this post is for you! Read on!


I must warn you to the check copyrights of videos before proceeding to download.

ClipGrab is very useful when downloading videos from sites such as YouTube and Facebook (some of my best friends are still addicted to it!) very easily. Much like YTD which I reviewed here. It supports some sites officially but can download from thousands of sites (According to the site!).

All you have to do is to visit the site and download the proper version for your OS. I’m using Ubuntu for this tutorial.

Next extract it to a directory of your choosing. And double click for it to run.

Main interface of ClickGrab
It’s divided into tabs, the first is Search. Which I used to find videos about ClipGrab!

How to download

The second is Downloads. Paste the video link and choose the quality. I’m using a video from the search results, and wait for it to end!
Downloading a file using ClickGrab

As simple as that!

The only drawback it can’t download some Facebook videos. But the rest is as smooth as milk!

Convert 

You can also use it to convert videos as long as you download ffmpg package, which also enables you to download videos with 1080 quality.

After download you can choose the format. And ClipGrab will download it in that format! I’ve saw this in YTD Pro! 

Feel free to donate to support the program! And click here to download for Linux.

Ubuntu 16.04 Gnome won’t launch + Fix

When upgrading to Ubuntu Gnome 16.04I was surprised that ClipGrab stopped working, it won’t even launch! Luckily the good people at ClipGrab gave me the easy fix. And that was to download and install the dependencies libqtgui4 and libqtwebkit4.
After downloading

libqtwebkit4 ClipGrab worked without a problem!

I hope you liked this post. Let me know what you think in the comments section to below.

إصنع لعبة فيديو بنفسك ومن دون كود

مارأيك أن تصمم لعبة الفيديو التي تحب بنفسك؟
وقبل أن تمتعض وتتذمر بشأن تعلن لغات البرمجة المعقدة وسطور الشيفرة البرمجية أريد أن أخبرك أن هنالك برامج يمكنها تصميم الالعاب البسيطة ثنائية الأبعاد دون الحاجة الى تعلم الكود!


كما ذكرت الأسبوع الماضي في مقالة اللعب على لينكس
سنستعرض معا مجموعة منها، مجانية ومدفوعة، ولك أن تختار منها مايناسب ذوقك وإحتياجاتك.

1. برنامج Game Maker يعتبر البرنامج اﻷشهر والأكثر رواجا في السوق،. يوفر مجموعة من التراخيص تتراوح في السعر بين $50 و 800 دولار، يوجد منه نسخة مجانية محدودة المميزات. للويندوز فقط.

2. برنامج Jump Craft من شركة First Productions ويتميز بأنه شديد السهولة ويمكن حتى للأطفال إستعماله، يعيبه ضعف الدعم الفني وقلة التطوير، سعر الترخيص 50 دولارا، يوجد منه نسخة مجانية محدودة المميزات. للويندوز فقط.

ملاحظة حول هذا البرنامج أنه لم يعد متوفرا للتحميل والشراء. ومنذ تاريخ كتابة هذه السطور في 2015 توقف دعمه بالكامل وتم حذف الموقع من الشبكة.

في مايو 2021 قام مطور البرنامج Andrew First بطرحه كبرنامج مفتوح المصدر.
3. برنامج Game Develop هو برنامج مجاني من شركة Compile Games يتميز ببساطة الواجهة وتنوع المخرجات، يمكنك من تطوير ألعاب للويندوز والماكنتوش واللينكس وألعاب المتصفحات وقريبا أندرويد و iOS وهو مجاني الترخيص بالكامل ويعتمد على التبرعات، يتوافر على الويندوز واللينكس.

تجتمع كل هذه البرامج في أن المصمم لايحتاج إلى كتابة الكود، بل يجده في “مكعبات” جاهزة هو يقوم بإضافتها بالفأرة ولوحة المفاتيح.

وفي النهاية أحب أن أخبرك أنني قمت بتصميم لعبة من قبل، على الويندوز ودون خبرة مسبقة في التصميم بإستخدام Game Maker وكانت بالفعل تجربة مرضية و قمت بنشرها مجانا في المجتمع ولاقت بعض الرواج 🙂 وإذا أردت أن تعرف عنها أكثر أدخل على تدوينتها، ويسرني أن تقوم بتحميلها D:

مارأيك فيما قراءت، هل تفتحت شهيتك لتصميم اﻷلعاب؟ مارأيك في مصممي اﻷلعاب العرب؟ وهل ستدفع مالا لقاء لعبة من تطوير عربي؟

How to add LibreOffice to PPA in Ubuntu, Latest version install

I once advocated Apache OpenOffice in favor of LibreOffice, I even had this tutorial where you can remove LibreOffice all together and install Apache OpenOffice to your computer. If you like doing so, that’s a personal choice.


I had to study both softwares and make a decision that will affect me for a very long time. I chose brains over heart and here we are with LibreOffice 4.4.4 waiting for the 5.0 milestone, again not saying that Apache OpenOffice is bad, read more about my choice from here.
Now we come to an important part, Adding LibreOffice to Ubuntu again

Since we used the command purge to remove LibreOffice, we have to install it all over again adding PPAs ( Personal Package Archives) to the system.

We can simply do that by opening a terminal window Ctrl + Alt + T and entering the following command

sudo add-apt-repository ppa:libreoffice/libreoffice-4-4

Update

And there is the GUI way for users who don’t feel comfortable around the terminal!

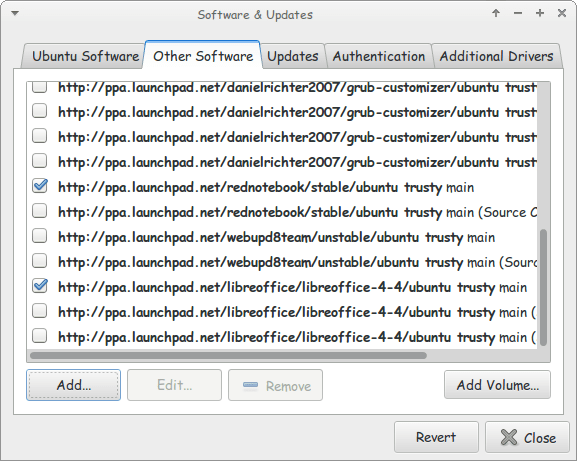
Go to Settings Software and Updates


Settings menu

Go to Other Software and click add


Enter the PPA name in the field and click add source (Copy and paste)

Adding the PPA

Enter password to confirm

You need the password to confirm

You will see that the source is added (In my case I took both screenshots after adding).


The PPA has been added!

This way we added the LibreOffice PPA to the software sources so the system can fetch automatic updates (we don’t have to update manually every time)

After we added LibreOffice PPA, Let’s install the latest version!

Use the command sudo apt-get purge libreoffice-* and confirm with y to remove the current version (if it’s really old).

Now we continue by downloading LibreOffice from the site and extracting it to the desktop, please note that the tar.gz file is just an archive and doesn’t need any compiling, just extract with your default archive manager!

Extract the folder DEBS to your desktop

In terminal enter cd Desktop

Then write cd DEBS (Hint: If you have the option Right click and choose Open Terminal Here).

Write the command sudo dpkg -i *.deb to install all the debs in the folder (Batch install).

After it’s done. You have LibreOffice fully running!

Finally

The first step I’m not really sure it’s necessary. I’ll have to wait till the next update to confirm that installing a new one removes the old (Can anyone confirm this to me?).

That was how to add LibreOffice PPA and install it to keep it always updated. Have a good one!

A quick fix to many Windows 8 – 8.1 bluescreen issues

Hey you guys 🙂

If you are using Windows 8 / 8.1 You would notice an awful lot blue screen of death screens BSOD. Now windows advices you to search online for the error .. (Da! Thanks for the tip captain obvious!)


What’s the cause of these errors?

Some of them are driver related. Others occur when you standby or lock the screen. Some after you install certain software..
The fix to all these causes and more is a simple command!
1. Go to the start menu and type CMD

2. When you see command prompt. Right click on it and choose: Run as administrator (Very important!)

3. The command prompt windows will show up. There right this command: “sfc /scannow”

This command checks the system files and attempts to fix the errors.
The process will take some time ( in my case it took an hour to complete)
After it’s done you will be prompted to restart once or twice. After that you are all good!

How easy was that? 🙂

Try it and let me know what you think. Did it fix your problem?
I hope I managed to turn the “frown” upside down 😀
Make sure to follow my blog and join my mail-list NEW

« Older posts Newer posts »