Category: How to (Page 15 of 20)

Remove the Get Windows 10 once and for all

What is GWX? Get Windows 10 is the advert Microsoft slipped into the Windows updatemasked as a “recommended update” KB3035583, after you install it you have to restart the computer. After that it will stay until you upgrade to Windows 10. I was flattered at first, especially after my upgrade was reserved “on it’s own”, but after upgrading and going back I started to think of it as more of a Spyware than a flattery.


Think of it! It was installed on it’s own, there is no way of closing it, it starts with the computer. Totally sounds like a Spyware to me!

Now that we know what is it and where it came from. Let’s take a look at removing it all together. And removing it means you don’t get to upgrade to Windows 10 from the store (good riddance!) Ehm! Removing GWX will tackle the source of the problem, attempting to close the application GWX will only close it for now. And it will dock itself happily on the task bar the next time you boot.

Removing Get Windows 10

We will uninstall the update that installed GWX which is KB303586 (make sure you only uninstall that and nothing else) and after restart the problem should go away.

Go to the start menu and type in Update to go to the Windows update, alternatively you can right click the GWX icon to go to the update (make a use of it at least!).

Open Windows Update

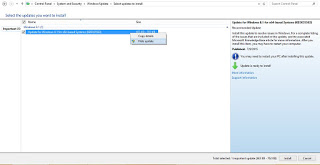
From there go to installed updates.


Go to installed updates

Scroll down until you find the culprit and uninstall it.

Click yes to uninstall it.

  Restart to continue


And once it’s done you need to restart to finish uninstalling

Do so and when you log in you won’t find it! Until you check again for updates! (remember how I underlined the should?).

GWX is gone!

To make sure you don’t install it again. Go to show all updates and right click it and choose hide.

Hide the update to get rid of it.

It should disappear now! But what if it doesn’t?

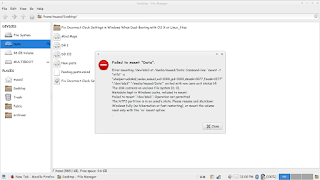
  • If you happen to see GWX again open Run and type in Regedit
  • Navigate to HKEY_LOCAL_MACHINESOFTWAREPoliciesMicrosoftWindowsGwx
  • Inside GWX create a new 32-bit DWORD value on the right-hand side named DisableGwx, and give it a value of 1.
  • This should take care of it once and for all!

I must repeat! If you had the least interest in downloading or trying Windows 10 don’t try this method as it will disable the application and thus take away your Windows 10 upgrade (for shame!).

Another tip to seal the deal

To prevent Windows 10 from downloading all together set your connection to be metered. I’ll be showing you how to do it in Windows 8.1 but I really don’t know how to do it in Windows 7 (I don’t have Windows 7).

Go to the network icon on the bottom right corner of your screen.

Right click on the network you use to connect and choose set as a Metered connection.

Windows will understand that you actually pay money to access the Internet and will not download the 3.6 GB update to your system (how considerate of him!).

Uninstall Windows 10 Reinstall Windows 8.1 using the same license (Not a rollback).

I’m happy to announce that I found a way to get back to Windows 8.1! Not from the rollback option or the recovery! My way is uninstalling Windows 10. And reinstalling Windows 8.1 using the same license!

It’s not a rollback. I had Windows 10 for over a month, plus I removed the Windows.old and reinstalled Windows 10. So no recovery options were available. What I did was an old fashion uninstall / reinstall job with some license work.
The method is very simple. I’m going to list somethings you need first:


  • Make sure your Windows 10 works.
  • Make sure you are using the same version of Windows 8.1 you had before.
  • You must be online the whole time. Your Windows 10 has to work because we are going to “Uninstall it”. If it doesn’t work for any reason DON’T INSTALL WINDOWS 8.1 RIGHT AWAY. I warned you!!

You need to repair or fresh install your version of Windows 10 in order to complete this tutorial. I made a post about it so feel free to check it out!

Uninstalling Windows 10

The first step is running the command prompt in administrator privileges.

and type in the commandslmgr /dlv

You will get an information box about your computer. What we need from here is the Activation ID.

Information box about your license
  • After getting it we are going to uninstall that product key (so we can use it after reinstalling 8.1). Type in :
    slmgr /upk 181520dd-3fc4-4df2-81f5c513467ad56d –
  • Iblurred out my key, so just put in yours-
  • If a box comes out saying your product is uninstalled. You done it right.
  • Go check the activation. If it says it’s not activated, then you are free to move into the next step.
Windows 10 is not activated

Installing Windows 8.1

Make sure you backup all your data. And that you have your license key (That came with the disk or in an e-mail) and if you don’t know where to find it. There is a helpful way to find it.
Get the Windows 8.1 disk. Boot from it by hitting F12 on boot.
Follow the installation procedure, format the drive Windows 10 is on and install Windows 8.1 there.
Make sure you are connected to the Internet when prompted.
Complete the installation as you would do normally. And when it comes to entering the key. Skip that step.

Activating Windows 8.1

When Windows 8.1 is up and running, run the command prompt in administrator privileges and type in the command
slmgr /ipk XXXXX-XXXXX-XXXXX-XXXXX-XXXXX
 Where XXXXX is your serial number, which you will find on the label of the disk or in the e-mail sent to you.

You will get a box saying key XXXXX-XXXXX-XXXXX-XXXXX-XXXXX installed successfully.

When checking the Windows activation, I found that the key used to activate was the same I had before upgrading to Windows 10. (I blurred mine for obvious reasons).

Windows 8.1 activation

Important Notes

If you use a different version of Windows other than you used, it won’t activate and you would have to reinstall Windows 8.1.

You must be online the whole time.
If you are dual-booting, you will have to do these steps again to make sure everything works.
If you are unable to find your license key use the software in this post.
Update: This part is written after rolling back.
I was forced to download all of the updates released for Windows 8.1. A total of 1.5 GB download on top of the 3 gigabyte download!
I hope you found this a useful post. Please comment below if anything. And if you are out there. Don’t upgrade to Windows 10.

Top 3 common issues faced when dualbooting

Dual booting can bring many perks if done properly. It’s like having two computers working together. And a really good idea in case one of the systems fails, you will have a configured running system and your work flow won’t be affected by the fail. As I had to fresh install Windows 10 from scratch (because the rollback failed).

There are some minor disturbances to take care of first. And those are mostly caused by Windows.

1. Ruins the dual boot.

I have a complete post about this topic! No matter what you do. Installing Windows will erase any grub boot data and you won’t be able to access your other system (in my case it was Xubuntu) I made a whole post dedicated to this as a part of the dual boot saga. So please checkout the post for the fix.

2. Time is always wrong

As you use Windows you will notice your time settings are forgotten every time you shutdown.

  • This is quite easy to fix as you just need to edit a registry key to set the time once and for all. From run open regedit.exe and navigate to :
    HKEY_LOCAL_MACHINE>SYSTEM>CurrentControlSet>Control>TimeZoneInformation
  • Create a dword32 key and name it “RealTimeIsUniversal” And set the value to 1 by double clicking on it.
  • Lastly reboot to Ubuntu and then to Windows and your issue will be fixed.

3. Error mounting drives

3. I couldn’t mount the data drive because Windows is still not totally shutdown, the drives are being used to “fast boot” in order to be able to use the drive without error, we need to disable fast boot. The screenshot shows an error caused by fast boot on Windows.

Error mounting drive in Ubuntu
Since it’s caused by Windows, we go and disable it from Windows.
Go to Start menu and type: Power Options and click on the choice.
Type in power options in the search bar
From there click on choose what the power buttons do.
Click change settings that are currently unavailable to unlock the greyed options.
change settings that are currently unavailable
Then uncheck turn on fast startup. And close the window.
Uncheck turn on fast startup
Once the fast boot is disabled you will be able to access all the drives from Ubuntu without a problem.
Here I tried to list my experience on dual booting to help with these three bugs I faced twice. I hope you find it useful 🙂
« Older posts Newer posts »