Category: Fix (Page 7 of 11)

Wifi not connecting on Ubuntu 14.04 LTS 2 [FIXED]

After that partial upgrade and the annoying Docky issue finally fixed, I thought I was safe, but another annoying issue appeared,  and this time hitting closer to home!

One of the issues that occurred after the partial upgrade is that the wifi breaks after putting the computer to sleep. Bluetooth worked fine but the wifi won’t connect!
After a failed connection this message would appear:

Connection Activation Failed

(4) did not receive a reply. Possible causes include: the remote application did not send a reply, the message bus security policy blocked the reply, the reply time out expired
or the network connection was broken.

I tried fixing the issue, switching of the Wi-Fi did not work.

Looking on-line I found that the most suitable solution was to download Wicd. A graphical network manager that asked for the network’s name and password. And started the connection process until I had connection!

So there you have it! Install Wcid to fix the Wi-Fi breaking issue on Ubuntu 14.04.

Did you like this post? Share it with your friends. Sharing is caring!

Fix the p { margin-bottom: 0.1in; line-height: 120%; }a:link { } problem in your blog

It happens more often with me than ever, maybe because now I write my posts outside of blogger and then paste them (and there is nothing wrong with that by the way!). It makes my blog look bad and a lot less professional.

I tried so many things including font play and adjusting the breakers, nothing worked! I was able to fix it so easily, so read on to learn the complete fix!
My old fix was to delete the post and post it again, and I’d lose the comments, and a lot of time. But thankfully I was able to fix it on my own. I looked the problem on line and found nothing.

The Fix

First of all if you publish your post and notice the Fix the p { margin-bottom: 0.1in; line-height: 120%; }a:link { } line where it shouldn’t be then go to blogger and edit the post.

The post has that line

On the edit menu you will see the button to the far left called “Compose”

Compose view

  and a button next to it called “HTML”, click on HTML.

HTML view

Even if you had zero knowledge with HTML, this fix is really easy (And I recommend you as a blogger to learn some HTML as it’s so easy to learn!).
What are we going to do is to remove the Fix the p { margin-bottom: 0.1in; line-height: 120%; }a:link { } line from the post, it’s highlighted in red so it should be easy.

The line to remove is highlighted in red

From the HTML view click find and search for “p { margin-bottom: 0.1in; line-height: 120%; }a:link { }” and you will find it looking like this <style type=”text/css” p { margin-bottom: 0.1in; line-height: 120%; }a:link { }</style
Delete only the line maintaining the brackets or you will result in an error, it needs to look like this after delete <style type=”text/css” </style
go back to compose and update, the problem will be fixed right away!!

So what’s the cause of this annoying bug anyway?

I discovered that it is caused by “Rich text formatting”, as I use LibreOffice to do all of my writing work, I tend to copy and paste directly into blogger, that caused these characters to appear inside the posts!

How to avoid it?

The only way is to strip the text of formatting before pasting it into blogger’s text editor, you can do that by clearing format from LibreOffice’s right click menu. Or by pasting it into a plain text editor like Notepad or Atom.

I hope you found this useful, how often did this happen to you? And how did you deal with it? Please let me know what you have in mind in the comments section below.

P.S: This post itself was infected with this issue, glad I could get it fixed eventually. 

Fix Raw USB or HDD on Toshiba HDD and other brands easily using Recuva

Here is a problem that is going to ruin your day. But it’s super easy to fix.
———————————————————————————————————————————–

Update February 2021

  • Run CMD as administrator.
  • Enter this command:
    chkdsk /f x:
    Where (x) is the name of your hard drive.
  • Let it work, and you’re good to go!
———————————————————————————————————————————–

I must note that the screenshots weren’t taken at the actual recovery job, but afterwards. And please check the disclaimer before continuing with this post.

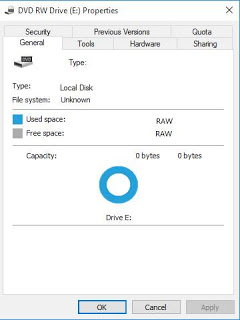
When your drive is RAW and you think all your data is gone. The reason is because the partition is damaged but all of your data is intact..

HDD is RAW


As long as the HDD isn’t clicking when connected and running normally. This fix applies to you. Disclaimer: (Attempt at your own risk) I’m not responsible of any data loss. Continue at your own risk..

I first tried with TestFisk 7.0 But after a day and a half (yes a day and a half!) and the data I recovered was jumbled and nameless (mostly there but scrambled) and totally out of place!

I attempted a fix the HDD with Gparted but it didn’t work and caused my system to freeze.

And I always recommend to have a backup of your data.

What I did was a simple format (after verifying that the data was there using TestDisk 7.0).

All you have to do is to is to format the drive (yes!!) and then preform a recovery on the drive to recover the data with the data structure intact.

Simple format dialog

Make sure you start the recovery immediately after the format to make sure no files are overwritten.

I used Recuva because it’s free, really easy to use and has a nice interface and it uses a wizard so it’s even more simpler. In case you are a first timer, I’ll post detailed steps 🙂

Download and install Recuva and start it to see this screen, and click Next.

Recuva startup wizard


On the next step choose other to show all files

and click Next.

Choose data type. Other

On the next screen we want to recover our lost data so we choose the newly formatted HDD and click Next.

Lost data location

Now choose if you want to enable deep scan, this will take a long time depending on your drive size and data. Check it and click next.

Enable deep scan

Let the setup run, this may take HOURS so keep in mind to plug in your laptop or to get a UPS. And the program will be minimized.

Scanning for data

Once it’s done, you will see the results page.

Scan results

Now that the data is recovered, it’s time to save it on your computer. Don’t choose the drive you scanned as a recovery directory.

Browse for a recovery directory


Reduces the chance of file recovery

Wait for the recovery to end. if it’s a lot of files it will take a really long time!

Recovering the files

Once the recovery is done, you are shown the results page.

The results page

Click OK and we are done!!

How easy was that?

I hope you find this useful. And that it saves your day!

« Older posts Newer posts »